Soldering temperature control in PCB assembly means you watch the heat at every step. This helps make strong solder joints. It also keeps delicate electronic parts safe. If you use too much heat, you can hurt the parts. If you use too little heat, the connections can be weak. Each step in soldering needs careful temperature control:
Thermal Profile Stage | Temperature Range / Rate | Duration / Notes |
|---|---|---|
Preheat Zone | 1-3°C per second | Heat up slowly to stop thermal shock |
Soak Zone | Temperature stays the same | 60-120 seconds for flux to work |
Reflow Zone | 235-250°C peak | Solder paste melts for strong joints |
Cooling Zone | 3-10°C per second | Cool down slowly to stop problems |
If you follow these steps, soldering temperature control in PCB assembly keeps your boards safe and working well.
Key Takeaways
Carefully control soldering temperature to make strong connections. This also helps protect small parts on PCBs.
Use the right temperature for each soldering step. Pick the correct range for the type of solder. This helps stop weak joints or damage.
Watch the soldering process with special tools. Use things like thermal profilers and temperature-controlled irons. These tools help keep the heat steady.
Do not use too much or too little heat. This helps stop problems like broken parts. It also prevents bad solder flow and parts moving out of place.
Change soldering settings for the solder type and PCB thickness. Also, think about the room conditions. This helps make boards that work well and last a long time.
Soldering Temperature Control in PCB Assembly
Definition
Soldering temperature control in PCB assembly means you watch the heat at every step. You use special tools to keep the temperature in the right range. This helps melt the solder just enough for strong connections. You need to think about the melting point of the solder alloy. You also need to know how thick the PCB is. Some parts are sensitive to heat and need extra care.
Here is a table that shows the main things about soldering temperature control in PCB assembly:
Soldering Aspect | Description |
|---|---|
Definition | You control heat to melt solder and make good connections on PCBs. |
Key Factors | Solder alloy melting point, PCB thickness, part sensitivity, soldering method. |
Importance | Stops problems like weak joints, bridging, or broken parts. Makes sure boards are made the same way each time. |
Common Methods & Temp. Ranges | – Reflow: Preheat 150-180°C, Soak 180-200°C, Reflow peak 230-250°C, Cooling controlled. |
Temperature Control Tools | Use temperature-controlled irons, reflow ovens, wave soldering machines, and thermal profiling. |
Effects of Improper Control | Too little heat makes weak joints. Too much heat can break parts or cause problems like bridging and tombstoning. |
Process Optimization | Follow solder melting points. Use thermal profiling. Think about PCB design to help with heat. |
You use special irons, ovens, and machines to keep the heat steady. You also check the temperature with thermal profiling tools. Careful control of soldering temperature helps stop cold joints or broken parts.
Importance
You need soldering temperature control in PCB assembly to make sure your boards work well and last long. If you do not control the heat, you can get weak joints or break the parts. The right temperature lets the solder flow and cover the pads and leads. This gives you strong and good connections.
Studies show that controlling temperature is very important for solder joint strength and how long parts last. If the temperature changes by just 10°C, you can get up to 4% shear strain in flip-chip solder joints. This much strain can make the joints break after only a few hundred cycles. High heat also makes chemical changes happen faster in the solder. These changes, like intermetallic growth and recrystallization, make the joints weaker. If you use too little heat, the solder does not flow well. This gives you poor wetting and weak joints.
You can check how well solder covers the surface with the Wetting Balance test. This test checks the force and time it takes for solder to cover a sample at set temperatures, usually between 245°C and 255°C. Good wetting means you have the right temperature and strong joints.
Industry rules, like IPC J-STD-002 and MIL-STD-883, say you need at least 95% solder coverage on leads and pads. You can only reach these rules if you keep the soldering temperature in the right range. If you go too high, you can get oxidation and lose material. If you go too low, you get bad soldering and weak joints.
Research on Sn–Zn solder alloys shows that higher soldering temperature can make better solder joints by lowering defects like floating pieces and poor filling. But if you go above 250°C, you start to see more oxidation and lose material. This means you must balance the temperature to get the best results.
You also need to think about how heat moves across the PCB. Studies show that tilting the board a little during vapor phase soldering helps spread the heat better. This lowers problems like tombstoning and moving parts. Good temperature control and the right board angle help you get better solder joints.
Tip: Always use the right temperature ranges for your solder and PCB type. Use thermal profiling to make sure your process stays safe.
If you control the soldering temperature well, you stop defects, protect your parts, and make sure your soldering meets industry rules. This keeps your products safe and reliable for your customers.
Soldering Temperature Ranges

General Ranges
It is important to know the right soldering temperature for each step. Most soldering uses heat from 180°C to 260°C. This range melts the solder and makes strong joints. It also keeps the board and parts safe. Experts test solder joints by heating and cooling them from -40°C to +125°C. This shows if the soldering can last in real life.
A reflow oven has different zones with steady heat. Each zone keeps the temperature even. This helps the solder melt and cool the right way. The oven moves heat using convection and conduction. Each zone stays at a stable temperature. This stops problems like cold joints or too much heat.
Soldering Process | Typical Temperature Range |
|---|---|
Reflow Soldering | 230°C – 250°C (peak) |
240°C – 260°C | |
Hand Soldering (Lead-based) | 330°C – 370°C (iron tip) |
Hand Soldering (Lead-free) | 350°C – 400°C (iron tip) |
Tip: Always use the right temperature profile for your process. This helps you get the best results.
Manual and Machine Soldering
You can solder by hand or with machines. Manual soldering uses a soldering iron. You set the iron to match your solder type. For lead-based solder, set it between 330°C and 370°C. For lead-free solder, use 350°C to 400°C. Machine soldering uses ovens or solder waves. These machines control the heat in each zone. This gives you steady temperature and better soldering.
Material Adjustments
You must change the soldering temperature for your solder and board. Different solders melt at different heats. Lead-free solder needs more heat than lead-based solder. Some boards are thicker or have more layers. These need more heat to reach the right temperature. Research says you should change the heat for each board and solder. If you do not change it, you can get weak joints or defects. Using the right temperature for your materials makes strong and reliable connections.
Consequences of Poor Soldering Temperature Control
High Temperature Issues
If you use too much heat, your PCB and parts can get hurt. High soldering temperature can push parts past what they can handle. This can burn, melt, or crack chips and wires. Lead-free soldering needs more heat, so it adds more stress. If you go over the glass transition temperature or melting point, you can damage the board and make it weak. High heat also makes chemical changes happen faster. Brittle layers can grow inside the joints. These changes make solder joints worse and can cause them to fail early.
Note: Too much heat can cause conductive anodic filaments, wire bond stress, and package breakdown. These problems make soldering worse and can make your board fail sooner.
Low Temperature Issues
If you use too little heat, the solder may not melt right. This means the solder does not flow or stick well. You might see dry soldering, where the solder does not cover the pads. Not enough heat can also mean less solder gets to the joints. This makes them weak. Uneven or low heat can cause defects like tombstoning, where parts lift up, or misalignment, where parts move during soldering. These problems make solder joints bad and can stop your board from working.
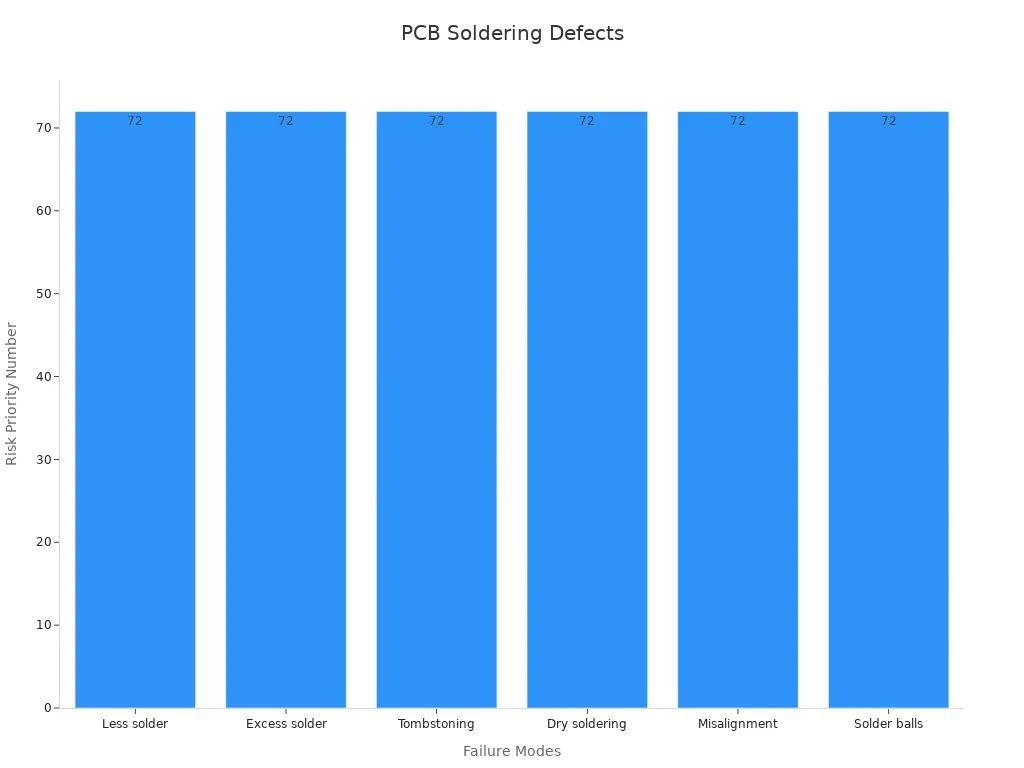
Here is a table that shows common problems from poor soldering temperature control:
Failure Mode | Description | Risk Priority Number (RPN) | Effect |
|---|---|---|---|
Less solder | Not enough solder at the joints | 72 | Functional failure |
Excess solder | Too much solder causes bridges and shorts | 72 | Functional failure |
Tombstoning | Uneven heat lifts parts off the board | 72 | Functional failure |
Dry soldering | Bad wetting from wrong temperature | 72 | Functional failure |
Misalignment | Parts move during soldering | 72 | Functional failure |
Solder balls | Small solder balls cause shorts | 72 | Functional failure |
You can see that each problem can make your board not work right.
Reliability Impact
Bad soldering temperature control does not just cause quick problems. It also makes your PCB not last as long. If you do not control the heat, you get tiny cracks, open circuits, and layers that come apart. These things make solder joints weak and your board less reliable. Studies show about 70% of electronic device failures come from packaging problems, with solder joint failure being the main reason. Big temperature changes and fast heating or cooling make brittle layers grow in the joints. This leads to cracks.
Tests like thermal cycling and life testing show that bad temperature control causes solder joint fatigue, delamination, and early part failure. For example, going from -40°C to +125°C can make tiny cracks and shorten your board’s life. Moisture and quick temperature changes can also move metal and cause peeling. This makes the board even weaker.
Solder bridges and tombstoning happen a lot when you do not control the heat.
Not enough solder and warping can affect up to 12% of boards.
All these problems make solder joints worse and your products less reliable.
Tip: Good soldering temperature control helps you stop these problems and keeps your boards working longer.
Soldering Temperature Control Methods
Tools and Equipment
You need the right tools to keep soldering safe. Use temperature-controlled soldering irons for hand soldering. These irons let you pick the right heat for your job. Machines like reflow ovens and wave soldering systems use sensors. These sensors help keep the heat steady. Always check your tools with regular calibration. Calibration makes sure the tip gets as hot as you set it. If you change the tip or heater, test the tool again. Some soldering irons have microprocessors. These keep the heat steady, even if you swap the tip.
Assembly Type | Optimal Temperature Range (°C) | Notes on Temperature Control and Equipment Use |
|---|---|---|
Through-Hole Assembly | 310 – 380 | Use temperature-controlled soldering iron for steady heat. |
250 – 270 | Lower temperature protects sensitive parts; precise control is key. | |
Wire Soldering | 350 – 400 | Higher heat needed; temperature control prevents damage. |
Tip: Always use the right tool for your soldering job. This helps you stop damage and make strong joints.
Process Monitoring
You must watch the soldering process to keep the heat right. Use thermocouples to check heat in different places. This helps you see if the heat is even. Set up control charts to track the temperature. These charts show if the heat stays safe. If you spot a problem, you can fix it fast. Use real-time dashboards to watch as you solder. Automated sensors help you collect data and see changes. You can also use tests like Wetting Balance Analysis. This test checks if solder flows well at the set heat.
Pick a key thing to watch, like soldering heat.
Collect data with sensors while you solder.
Set safe limits based on old results.
Watch for changes or problems.
Fix any issues to keep things safe.
Environmental Factors
The room can change how soldering works. Room heat, humidity, and airflow all matter. If the room is cold, the board cools too fast. If it is hot, you may need to lower the set heat. Good airflow helps keep the heat even. Always check the room before you start soldering. Change your settings if the room changes a lot. This helps you keep soldering steady and joints strong.
Note: Watch for changes in the room. Even small changes can affect how solder melts and flows.
You help make sure your PCB assemblies stay strong and last long. Studies show that as electronics get smaller and do more, solder joints get more stress and heat. Watching the temperature closely helps stop cracks, empty spots, and other problems. If you follow rules like IPC-7530A and use good temperature tools, you protect your parts and get better results. Always use the right temperature ranges to keep your boards safe and working well for a long time.
FAQ
What happens if you use the wrong soldering temperature?
If you use the wrong temperature, you can get weak joints or damage parts. Too much heat can burn components. Too little heat can cause poor connections. Always check your settings before you start.
How do you know the right soldering temperature for your project?
You should check the solder type and the board material. Look at the manufacturer’s guide. Use a thermal profile chart. This helps you pick the best temperature for strong and safe joints.
Can you use the same temperature for all soldering jobs?
No, you cannot. Different solders and boards need different temperatures. Lead-free solder needs more heat than lead-based solder. Thick boards may need higher temperatures. Always adjust your settings for each job.
Why does room temperature matter during soldering?
Room temperature changes how fast your board heats and cools. If the room is too cold or too hot, you may need to change your soldering settings. Good airflow also helps keep the temperature even.