You can use a lithium battery to provide Raspberry Pi battery power for your projects. This allows you to create portable projects that you can carry around. Many makers choose lithium batteries for several reasons:
You use less energy with battery power.
You get steady performance without low-quality converters.
You have more room inside your project case.
Utilizing battery power for Raspberry Pi enables you to modify your designs more easily. Consider what your project requires before you start.
Model Selection
Power Needs
You need to know how much power your Raspberry Pi uses before you pick a battery. Each model has different needs. Some use more energy than others. The table below shows popular battery modules and which Raspberry Pi models they support. This helps you match the right hardware to your project.
Product Name | Compatibility | Price | Link |
|---|---|---|---|
PIco Double Li-Ion 18650 Battery Holder | Raspberry Pi B, B+ | $11.95 | |
UPS PIco HV3.0B+ HAT Top-End 450 | Raspberry Pi 3 Model B+ | $35.95 | |
UPS PIco HV3.0B+ HAT Stack 450 PoE | Raspberry Pi 3 Model B+ | $34.95 | |
LiFePO4wered/Pi+ | Raspberry Pi (various models) | N/A |
You also need to check how much current your Raspberry Pi draws. The chart below shows the power use for different models. For example, a Raspberry Pi 3 B+ can use up to 400 mA, while a Zero model uses much less.
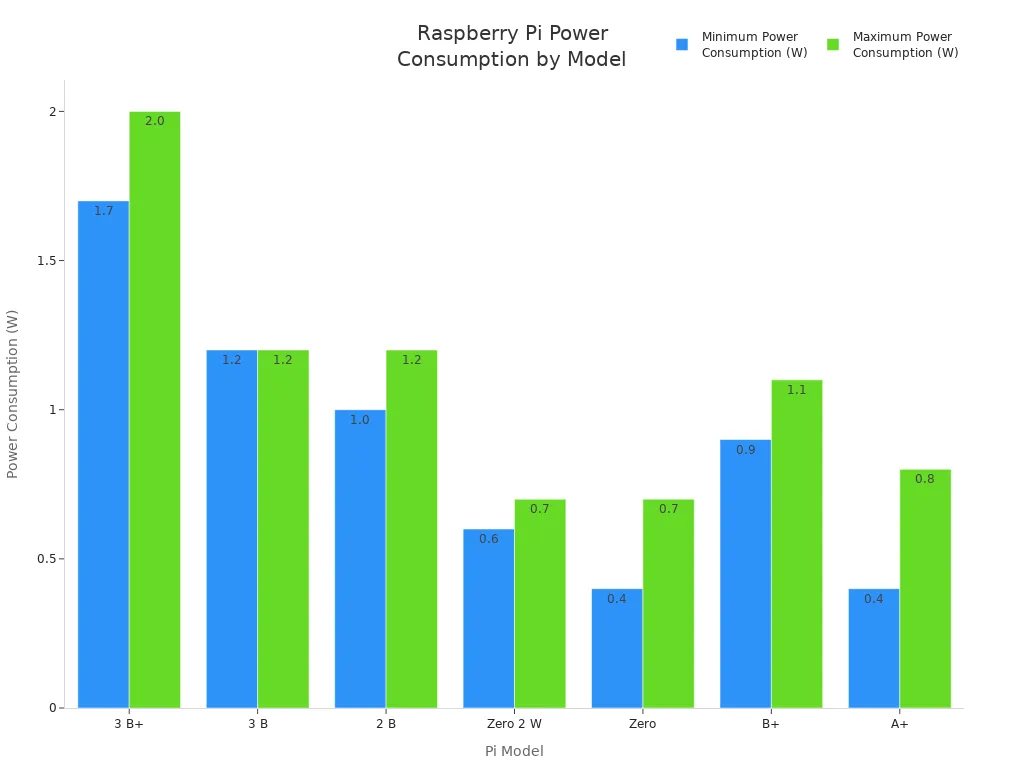
If you want longer battery life, choose a model with lower power needs. This makes your Raspberry Pi battery power setup last longer.
Impact on Battery Life
Your choice of Raspberry Pi model changes how long your project can run on a battery. Here are some things to keep in mind:
The Raspberry Pi 4 Model B with an SSD runs for about 5 hours on a normal battery. Using an SD card instead of an SSD can make it last longer.
Faster storage, like an SSD, helps your Pi start apps quickly but uses more power.
The Raspberry Pi 5 needs even more power. It may not work well for portable projects that need long battery life.
Tip: If you want your project to last all day, pick a model with lower power use and avoid extra hardware that drains the battery.
Choosing the right model helps you get the most from your Raspberry Pi battery power project.
Battery Life Calculation
Current Draw and Capacity
You need to know how much current your Raspberry Pi uses before you pick a battery. Each model draws a different amount of power. The table below shows the typical current draw for popular Raspberry Pi models. You can see how much power your project might need when idle or under heavy use.
Raspberry Pi Model | Idle Current Draw (W) | Idle Current Draw (mA) | Under Load Current Draw (W) | Under Load Current Draw (mA) |
|---|---|---|---|---|
Raspberry Pi 5 | 3.0-3.5 | 600-700 | 7.0-9.0 | 1400-1800 |
Raspberry Pi 4 B | 2.5-3.0 | 500-600 | 5.0-7.5 | 1000-1500 |
Raspberry Pi 400 | 2.7-3.2 | 540-640 | 5.5-7.5 | 1100-1500 |
Raspberry Pi 3 B+ | 1.9-2.3 | 380-460 | 3.5-5.5 | 700-1100 |
Raspberry Pi Zero 2 W | 0.5-0.7 | 100-140 | 1.5-2.2 | 300-440 |
Raspberry Pi Zero W | 0.4-0.5 | 80-100 | 0.8-1.5 | 160-300 |
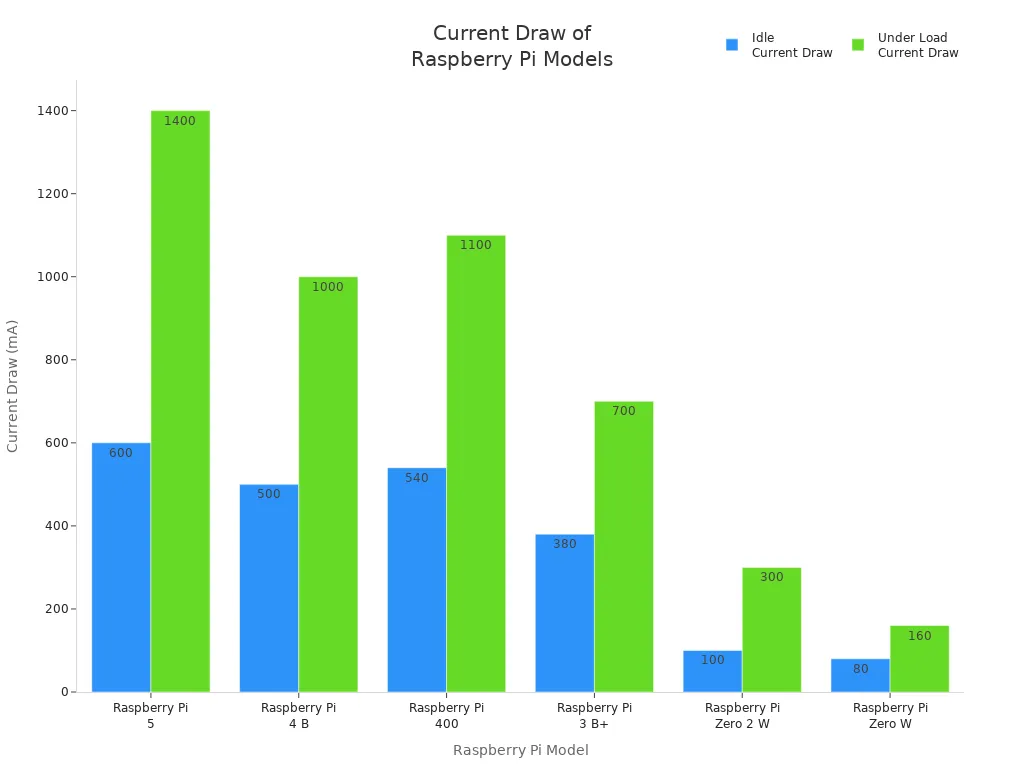
Note: The current draw changes based on what you do with your Raspberry Pi. If you play videos or use GPIO pins, your battery will drain faster. When your Pi sits idle or uses deep sleep, it uses less power.
Example Calculations
You can estimate how long your Raspberry Pi battery power setup will last by using a simple formula. This helps you plan your project and avoid running out of power.
To calculate battery life, use:
Life (in cycles) = (Capacity x 100) / (Discharge rate x Depth of discharge)
Capacity is in amp-hours (Ah)
Discharge rate is in amperes (A)
Depth of discharge is the percent of battery used before charging
Let’s say you use a 5000mAh (5Ah) lithium battery and your Raspberry Pi 4 B draws 1A under load. If you use 80% of the battery before recharging, your calculation looks like this:
Life = (5 x 100) / (1 x 80) = 500 / 80 = 6.25 cycles
For a single charge, you can estimate run time like this:
Run time (hours) = Battery capacity (Ah) / Current draw (A)
Example: 5Ah / 1A = 5 hours
Tip: If your project uses deep sleep or stays idle, you can get more hours from your battery. Startup uses more power, so frequent reboots can shorten battery life.
You can use these calculations to choose the right battery for your Raspberry Pi battery power project.
Choosing a Lithium Battery
Capacity vs. Portability
When picking a battery for your Raspberry Pi, you need to think about how long it lasts and how easy it is to carry. Bigger batteries let your project run longer, but they are heavier and take up more room. Smaller batteries are lighter and fit in small spaces, but they do not last as long.
You can use different kinds of batteries for Raspberry Pi projects:
Nickel-Metal Hydride (NiMH) Batteries
Lead-Acid Batteries
Most people like lithium-ion or lithium polymer batteries best. These batteries hold a lot of energy in a small size. They are good for portable projects and give steady Raspberry Pi battery power.
Tip: Always check if the battery has safety labels before you buy it. Look for UN38.3, UL1642, and IEC62133. These labels mean the battery passed important safety tests.
Certification | Description |
|---|---|
UN38.3 | This is needed for shipping lithium batteries safely around the world. It makes sure the battery follows safety rules. |
UL1642 | This checks that lithium battery cells are safe and do not overheat or short out. |
IEC62133 | This is a worldwide rule for rechargeable batteries. It helps keep batteries safe in portable devices by stopping problems like overheating or leaking. |
Project Trade-Offs
Think about what your project needs before picking a battery. If you want your Raspberry Pi to work for a long time, you might need a bigger battery. This will make your project heavier and larger. If you want your project to be small and light, you may have to charge it more often.
Bigger batteries (like D-size) last longer but are heavier and larger.
Smaller batteries (like AA) are lighter but do not last as long.
The battery type and how much power your project uses will change how long it works.
You should also look at new battery technology. Some new single-cell Li-Ion UPS devices can give enough power to your Raspberry Pi and keep it on until you turn it off safely. Modern battery management systems (BMS) use special designs and even AI to watch battery health and stop problems. These features help your battery last longer and keep your project safe.
Note: Your battery may not last as long as you expect. Using a lot of power can make the battery less efficient. Always choose a battery that can handle the most power your project might use.
Raspberry Pi Battery Power Setup

You need the right parts and a good plan to set up Raspberry Pi battery power. This helps your project work safely and well. Below, you will see the main parts you need, easy setup steps, and how each method compares.
Basic Charge Controller
A charge controller keeps your lithium battery and Raspberry Pi safe. It controls how the battery charges and stops damage. You should always use a charge controller with lithium batteries.
Charge Controller | Description |
|---|---|
TP4056 | Controls current and voltage for lithium batteries. Stops overcharging and helps the battery last longer. |
MT3608 | Changes 3.7V to 5V. Lets you use battery power well and keeps charging safe. |
A good charge controller has many safety features:
Protection Mechanism | Description |
|---|---|
Overcharge Protection | Stops the battery from charging too much. |
Reverse Protection | Keeps things safe if you connect the battery wrong. |
Short Circuit Protection | Stops too much current, which can cause heat. |
Tip: Always look for these safety features before you buy a charge controller. They help keep your Raspberry Pi battery power setup safe.
Step-by-Step: Adding a Charge Controller
Solder the charge controller onto your battery board.
Connect the battery holder to the controller.
Attach the output wires to the Raspberry Pi power input.
Test the voltage output before you connect your Raspberry Pi.
A 4-cell 18650 battery holder gives you more run time. Many charge controllers also let you charge fast up to 3000mA and switch power between battery and adapter without stopping.
DC/DC Converter
A DC/DC converter changes the battery’s voltage to what your Raspberry Pi needs. Most lithium batteries give 3.7V, but your Raspberry Pi needs 5V.
Specification | Importance |
|---|---|
Current Capacity | Must give up to 3 amps for Raspberry Pi 4, especially at startup. |
Efficiency | High efficiency (up to 95%) saves energy. |
Stable Voltage Output | Should give about 5.3V, but never more than 5.45V. |
Low Internal Resistance | Saves power and helps your project work better. |
Ring Inductor Design | Handles high current needed to start the Raspberry Pi. |
Some popular DC/DC converters are:
Model Description | Voltage Handling | Price Range |
|---|---|---|
Step Down Buck Converter | Up to 30V | $25 or more |
High-end 12V Converter | 36V to 12V | N/A |
Do not use cheap USB C power adapters. They often break and may not protect your Raspberry Pi battery power system.
Step-by-Step: Installing a DC/DC Converter
Connect the battery output to the DC/DC converter input.
Use a multimeter to set the output voltage to 5.1V–5.3V.
Attach the converter output to the Raspberry Pi power pins or USB port.
Test the system by checking voltage at the Pi’s power input.
You can add a switch between the battery and converter for easy power control. Always check the converter’s max current output. For Raspberry Pi 4, you need at least 3A.
Power Boost Module
A power boost module helps keep the voltage steady as your battery runs down. It raises the voltage from 3.7V to 5V, which is just right for Raspberry Pi battery power projects.
Feature | Description |
|---|---|
Internal Boost Converter | Raises voltage from 3.7V to 5V for Raspberry Pi. |
Low Discharge Cut-off | Stops the battery from draining too much, which keeps it safe. |
High Charge Cut-off | Stops overcharging, making your setup safer. |
Voltage Stability | Keeps output at 5V even as the battery gets low. |
Shutdown Threshold | Shuts down at 2.5V to protect the battery from damage. |
Note: Power boost modules are great for portable projects. They help your Raspberry Pi run longer and stay safe.
Step-by-Step: Using a Power Boost Module
Connect the lithium battery to the power boost module input.
Attach the module output to the Raspberry Pi’s 5V and GND pins.
Make sure the output stays at 5V, even as the battery drains.
Watch for automatic shutdown when the battery gets low.
Essential Hardware Overview
Here is a quick list of the main hardware you need for a safe Raspberry Pi battery power setup:
Component Description | Details |
|---|---|
Maximum Current Output | 5.1V 5000mA |
Battery Holder | 4-cell 18650 battery holder |
Protection Features | Overcurrent, overvoltage, reverse connection |
Efficiency | Up to 95% for best power use |
Power Input Range | 6V to 18V |
Fast Charging Capacity | 3000mA |
Power Switching | Switches between backup and adapter easily |
Auto Power-off | Turns off when the Pi is shut down |
Standby Power Consumption | Very low to help the battery last longer |
Comparing Setup Methods
Each method has good and bad points. Here is a simple comparison:
Method | Pros | Cons |
|---|---|---|
Basic Charge Controller | Easy to use, protects battery and Pi | May not boost voltage for all Pi models |
DC/DC Converter | Handles high current, steady voltage | Needs careful setup, costs more |
Power Boost Module | Keeps 5V output, protects battery | May not give enough current for Pi 4 |
Basic charge controllers are good for easy projects and smaller Raspberry Pi models.
DC/DC converters work best for high-power models like Raspberry Pi 4 or 5.
Power boost modules are great for portable projects that need steady voltage.
Test your setup often. Check voltage and temperature to keep your Raspberry Pi battery power system safe. Many people find a good setup can run a Raspberry Pi for hours, but you may need a bigger battery for all-night or outdoor use.
You can use a lithium battery to run your Raspberry Pi. First, check that the voltage is correct. Protect your battery from getting too full or too empty. Always look at your connections to make sure they are safe. The table below lists important things to remember:
Feature | Description |
|---|---|
Voltage Input | 3.7V from Li-ion cells |
Voltage Output | Boosts to 5V for your Raspberry Pi |
Battery Protection | Stops overcharge and over-discharge |
LED Indicators | Green for charged, red for charging |
Some people wonder if a powerbank or solar panel will work. Yes, you can use them if they give at least 5V and 2.5A.
Try out different ways to power your Raspberry Pi. Share what you find. If you have questions or ideas, write a comment below!
FAQ
Can you use any lithium battery with a Raspberry Pi?
You need to use a lithium battery that matches your Raspberry Pi’s voltage and current needs. Most Pi models need 5V. Always check the battery’s output and use a charge controller for safety.
How do you know if your battery is big enough?
Check your Raspberry Pi’s current draw. Divide the battery’s capacity (in mAh) by the Pi’s current use (in mA). This gives you the run time in hours. Add extra capacity for safety.
Is it safe to charge the battery while the Raspberry Pi is running?
Yes, you can charge and use the battery at the same time if you use a proper charge controller. The controller protects both the battery and your Raspberry Pi from damage.
Can you use a power bank to run a Raspberry Pi?
Yes! Many power banks work well if they provide at least 5V and 2.5A. Some power banks turn off with low loads, so test yours before using it in your project.
What happens if the battery runs out while the Raspberry Pi is on?
Your Raspberry Pi will shut down suddenly. This can cause data loss or corruption. Use a battery management system or UPS HAT to safely shut down your Pi when the battery gets low.