You can build a great electronics workbench with just a bit of planning. Anyone can do it, no matter your skill level. Start by thinking about your project type, your space, and how often you want to work. Safety matters too. Take a moment to picture your goals and look at your available space. Organization and comfort will help you work better.
Plan Your Workbench
Define Your Needs
Think about what you want from your electronics workbench before you start. Do you want to work on hobby projects, fix things, or do research? The type of project you pick changes what you need. Look at this table to see how different projects need different setups:
Project Type | Space Requirements | Tool Requirements | Additional Needs |
|---|---|---|---|
Hobby Electronics | Needs less space | Needs fewer tools | Can use a shared space like a desk |
Professional Repair | Needs more space | Needs more tools | Needs extra storage for parts and repairs |
R&D | Needs more space | Needs more parts | Needs space for books and a computer |
Think about how often you will use your workbench. If you use it every day, you need it to be comfortable and organized. If you use it sometimes, you can keep it simple.
Tip: Write down your main goals for your electronics workbench. This helps you stay focused and not buy things you don’t need.
Space and Budget
Check your space before you set up your workbench. Measure the area you want to use. Here is a quick guide for the smallest workspace size:
User Type | |
|---|---|
Hobbyists | 24–30 |
Professionals | 30–36 |
Think about your budget. You do not need to spend a lot to start. Pick strong materials for your work surface. Strong surfaces handle chemicals and electricity better. If you can, get a table with adjustable height. This helps you stay comfortable during long projects.
Make a list of the most important electronics workbench equipment. Plan for storage, good lighting, and easy power outlet access. Try to leave space for upgrades. Modularity lets you add new tools later. Safety is important too. Add emergency switches and keep safety gear close.
Note: Planning ahead saves you time and money. A flexible workbench grows with your skills and projects.
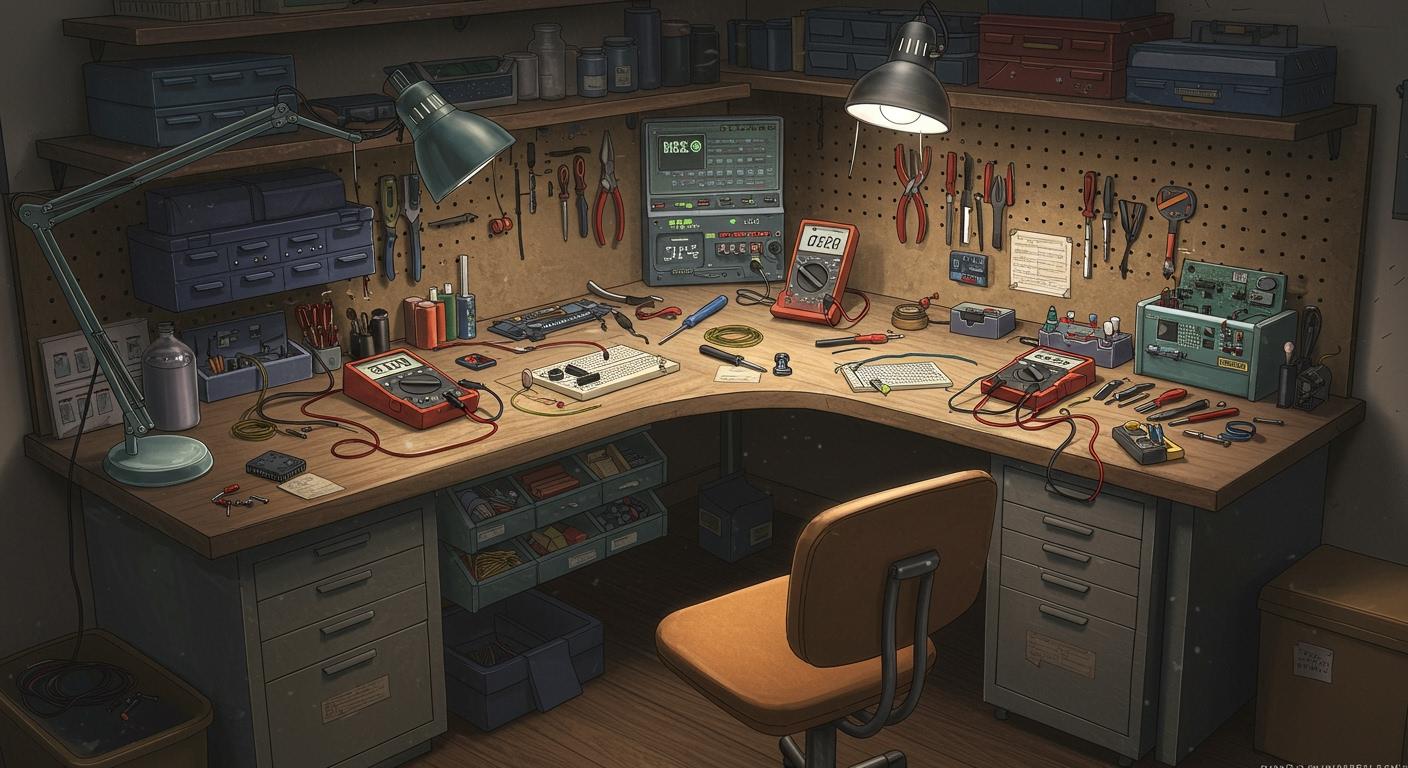
Setup Essentials
Sturdy Table
Your electronics workbench starts with a strong table. You want a surface that can handle heavy equipment and lots of tools. A wobbly table makes it hard to work safely. Look for a table with a reinforced frame. This keeps everything steady, even when you lean in close to use your soldering iron. Some tables come with ESD protection, which helps stop static electricity from damaging your projects. If you work with sensitive parts, this feature is a must.
Here’s a quick look at what makes a table great for electronics work:
Feature | Description |
|---|---|
ESD Protection | Stops static electricity from hurting your electronics. |
Tool Organizers | Keeps your tools close and easy to grab. |
Reinforced Frames | Holds up heavy gear and lasts a long time. |
Modular Accessories | Lets you add things like a soldering iron stand or extra shelves. |
Grounding Solutions | Protects your equipment from static discharge. |
Excellent Lighting | Helps you see small parts and soldering points clearly. |
Static-Free Design | Prevents static build-up that can ruin your work. |
When you pick a tabletop, think about the material. ESD laminate is a popular choice because it protects against static. Silicone rubber is another good option. It’s safe if you drop a hot soldering iron or make sparks.
Material Type | Description |
|---|---|
ESD Laminate | Special plastic that stops static. Comes as ready-made tops or in rolls. |
Silicone Rubber | Safe around heat and sparks. Better than vinyl or PVC for electronics work. |
Storage Solutions
You will collect lots of small parts and tools. Good storage keeps your workbench neat and makes it easy to find what you need. You don’t want to waste time searching for your soldering iron or a tiny resistor. Try using bins, drawers, and shelves. Some people like rolling storage units so they can move their tools around.
Here are some top storage ideas:
Sortimo T-BOXX G line for high-end, organized storage.
Stanley organizers that stack and work with Craftsman products.
Akro-Mils storage bins with lots of drawers for resistors, screws, and small parts.
DIY rolling storage units for moving organizers where you need them.
Self-stick foam weather stripping to seal bins and keep parts from mixing.
Proper storage does more than just keep things tidy:
You can grab your soldering iron or parts fast, which saves time.
Your expensive tools and components stay safe from damage.
A clean bench helps you avoid accidents and keeps your workspace safe.
Tip: Label your bins and drawers. You’ll always know where your soldering iron tips and other tools are.
Lighting and Power
Good lighting is key for electronics work. You need to see tiny parts and soldering points clearly. Overhead lights help, but a bright desk lamp makes a big difference. Place your lamp so it shines right where you work. This helps you spot mistakes before they happen.
You also need plenty of power outlets. Electronics projects use lots of gear—oscilloscopes, power supplies, and your soldering iron. Make sure your bench has enough outlets for everything. Some people install power strips along the back of the table. Others add outlets under the bench. You never want to run out of places to plug in your soldering iron or other tools.
Note: It’s better to have too many outlets than not enough. You’ll thank yourself later!
Adjustable Height
Comfort matters when you spend hours at your workbench. An adjustable height table lets you set the perfect level for sitting or standing. This helps you keep your elbows at a 90-degree angle and your wrists straight. You’ll feel less tired, even after a long session with your soldering iron.
Ergonomics experts say that a neutral body position keeps you safe and comfortable. Adjustable benches help prevent sore muscles and injuries. OSHA reports that many workplace injuries come from poor posture. A table you can raise or lower helps you avoid these problems.
You can change the height for different tasks, like soldering or assembling parts.
Adjustable benches help you work longer without getting tired.
They make it easy to share your workspace with others, since everyone can set their own height.
Ventilation
Soldering and cleaning can create fumes that are not safe to breathe. Good ventilation keeps your air clean. You should use a fume extractor at your soldering station. This device pulls fumes away from your face and filters them out. Some extractors have adjustable arms, so you can point them right where you need them.
Here are some smart ways to keep your workspace safe:
Ventilation Solution | Description |
|---|---|
Local Exhaust Ventilation | Fume extractors at each soldering station catch fumes at the source. |
Enclosed Cleaning Systems | Special vents keep solvent vapors away during cleaning. |
Spray Booths with High-Efficiency Exhaust | Removes spray and chemicals during coating. |
Real-time Air Quality Monitoring | Lets you check if your air stays safe while you work. |
Professional solder fume extractors come in many sizes.
Some have arms you can move to target the fumes from your soldering iron.
Clean air helps you stay healthy and focused.
Safety First: Always turn on your fume extractor before you use your soldering iron. Clean air is just as important as clean tools.
Tools and Safety
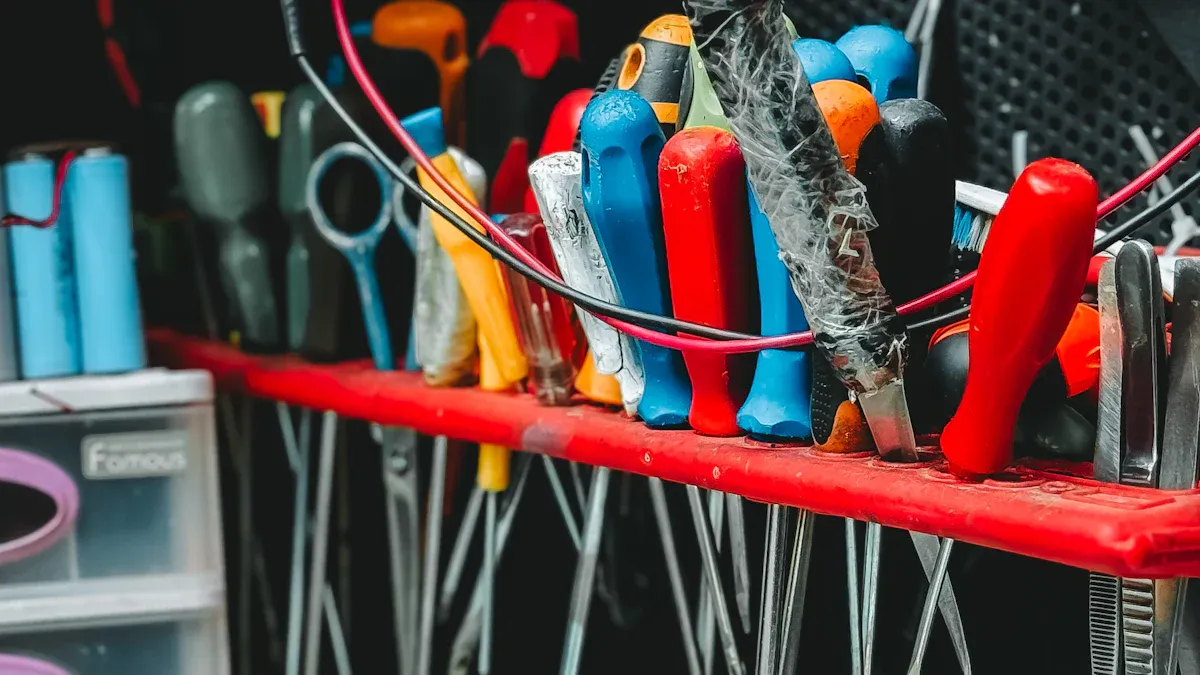
Essential Tools
You need the right tools to use your electronics workbench. If you are new, start with simple tools. As you learn more, you can get better equipment. Here is a list of what you might need:
Beginner Tools | Advanced Tools |
|---|---|
Basic soldering iron | Temperature controlled soldering station |
Multimeter (basic) | Advanced multimeter |
Wire strippers | Precision wire strippers |
Screwdrivers, pliers | Specialized hand tools |
Breadboard and jumper wires | PCB design tools and equipment |
You can also look at how much these tools cost. The chart shows what you might pay to set up your bench.
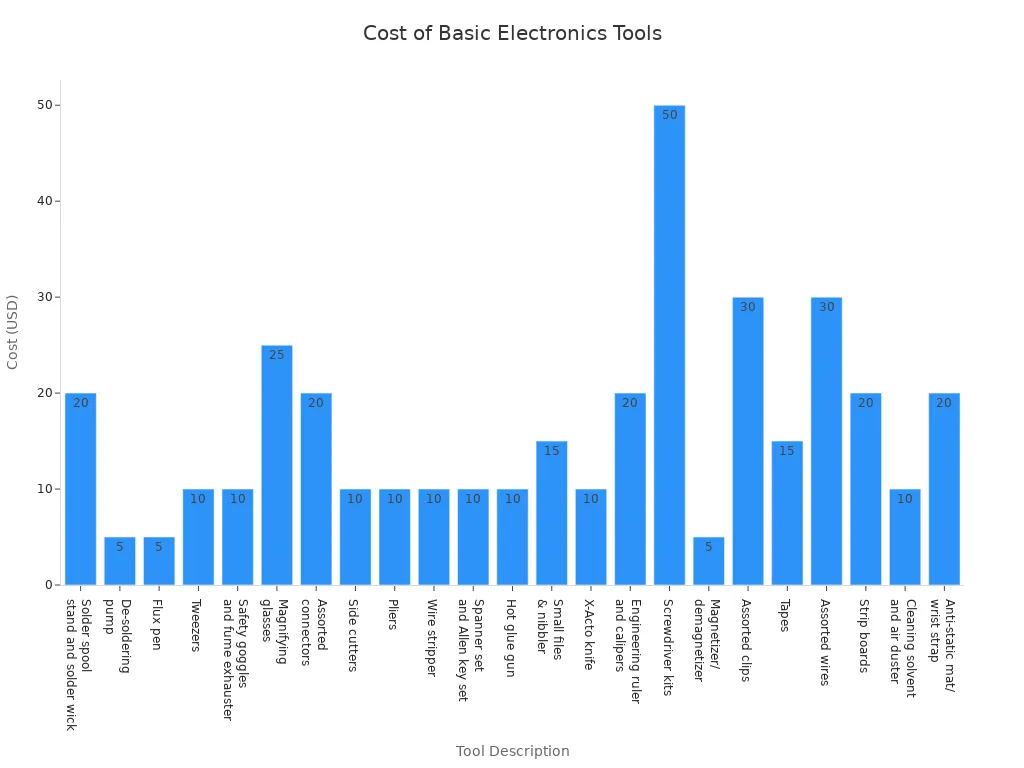
Tip: Begin with simple tools. Get better ones as you get better at electronics.
Anti-Static Mats
Static electricity can break your electronics before you finish. Anti-static mats help stop this from happening. These mats have special stuff that takes away static charges. When you put your parts on the mat, it moves static to the ground. This keeps your parts safe from harm.
Always use an anti-static mat with microchips or circuit boards. It is an easy way to protect your projects and keep your area safe.
Safety Gear
Safety is important every time you work at your bench. Here are some things you should have:
Safety gear like goggles and gloves
Fire extinguisher close by
Good airflow to get rid of fumes
Check power strips and outlets often
You can stop most accidents by being careful and using the right gear. Many people forget to check outlets or wear goggles, but these steps really help.
Remember: Safe habits let you enjoy electronics without worry.
Best Layout for an Electronics Workbench
Workflow Organization
You want your workbench to help you work faster and make fewer mistakes. Start by looking at the size and shape of your table. Make sure you have enough space for your projects and tools. Modular workstations let you change your setup for different tasks. You can add or remove shelves, bins, or tool racks as needed.
Here are some tips to organize your workflow:
Put the tools you use most often within arm’s reach.
Use under-table storage like rolling bins for big items.
Label every drawer and container. Color-coded labels help you find parts quickly.
Keep a special area for each project. Store all related parts together so you don’t lose anything.
Use vertical space. Hang tools on pegboards or shelves above your bench.
A smart layout can boost your speed and cut down on errors. Take a look at this table to see how good organization helps your work:
Benefit | Description |
|---|---|
Increased Assembly Speed | You can grab tools and parts quickly, so you finish projects faster. |
Enhanced Reliability | Fewer mistakes happen when everything has a place. |
Assembly Time Reduction | You spend less time searching, so you get more done. |
Lower Error Rates | Organized tools and parts mean fewer mix-ups and better results. |
Tip: Only keep what you need on your workbench. If you don’t use something often, store it somewhere else. This keeps your workspace clear and easy to use.
Cable Management
Cables can get messy fast. Tangled wires slow you down and can even cause accidents. You want to keep cables neat and easy to reach. Try these ideas:
Use cable clips or ties to bundle wires together.
Run cables along the edge of your bench or under it.
Label each cable so you know what it connects to.
Use cable sleeves for groups of wires. This keeps them tidy and safe.
Mount power strips under your table to keep cords off your work surface.
Good cable management makes your bench safer and easier to clean. You won’t trip over wires or waste time untangling them. Plus, your workspace looks more professional.
Cleanliness
A clean workbench helps you stay safe and do better work. When your space is tidy, you don’t get distracted by clutter. You lower the risk of accidents, like tripping or knocking things over. Clear pathways and organized tools make your bench safer for everyone.
Keeping your workbench clean also shows you care about your projects. People notice when your space looks neat. It makes you look skilled and ready for any challenge. If clients or friends visit, they’ll trust your work more.
Don’t forget to wipe down surfaces often. Dust and dirt can mess up sensitive electronics. Regular cleaning keeps your parts safe and your projects running smoothly.
Note: Make cleaning part of your routine. Spend a few minutes at the end of each session putting things away and wiping down your bench. You’ll thank yourself later!
When you follow these steps, you create the best layout for an electronics workbench. You work faster, make fewer mistakes, and stay safe. Your projects will look better, and you’ll enjoy your time at the bench even more.
Resources and Upgrades
You want to build a workbench that grows with you. This guide covers everything from bench setup to choosing the right tools. You can find tips for organization, test equipment, and even how to add a computer workstation. If you plan to set up an electronics lab, this resource gives you step-by-step advice. You will learn about soldering tools, prototyping supplies, and how to pick the best hand tools. The guide also talks about consumables and parts, so you know what to stock up on.
Sourcing Parts
Finding the right parts makes your projects easier. You have many choices for buying electronics components and tools. Here are some trusted sources:
Blue Paper Technology LLC offers essential parts and tools for your workbench.
SparkFun is great for small-quantity Maker electronics and open-source circuits.
AdaFruit focuses on education and small electronics kits.
Digikey sells large quantities of parts like resistors and connectors.
Jameco is good for motors, servos, and hobby parts.
McMaster-Carr supplies nuts, bolts, and mechanical parts.
Servo-City specializes in robotics parts.
The Big Bearing Store helps with bearings for CNC projects.
You can also check SunFounder for direct links to hardware. This makes it easy to find what you need for your electronics workbench.
Tip: Compare prices and shipping times before you buy. You can save money and get your parts faster.
Future Expansion
Your electronics workbench should be ready for upgrades. You want to keep up with new technology and tools. Here are some things to think about:
Look for new materials and designs that make your work easier.
Automation and smart manufacturing can help you work faster.
More suppliers mean better prices and more choices.
Cost-efficient upgrades save you money in the long run.
Easy installation lets you add new tools without hassle.
Safety rules change, so keep your workspace up to date.
Eco-friendly products help you protect the environment.
Online stores make it simple to order new parts.
If you plan ahead, you can add new features as your skills grow. Your workbench will always fit your needs.
You can build a great electronics workbench by following a few simple steps. Start with a sturdy table, add smart storage, and set up good lighting. Keep your space organized and check for safety every day, week, or month, depending on your needs. Try these tips for long-term success:
Store your devices properly.
Update your software often.
Use scheduling tools for reminders.
As you learn more about how to equip your ee lab, upgrade your tools and workspace. Stay curious and enjoy every project you build!
FAQ
What is the best way to start building my electronics workbench?
You should begin by choosing a sturdy table and making a list of the tools you need. Measure your space and think about your budget. Start simple and add more features as you learn.
How do I keep my workbench organized?
Try using bins, drawers, and shelves for your tools and parts. Label everything. You can make organizing your electronics workbench easier by cleaning up after each project.
What safety gear do I need for electronics projects?
You need safety goggles, gloves, and a fire extinguisher nearby. Make sure you have good ventilation. Always check your power outlets before you start working.
How can I improve lighting at my workbench?
Place a bright desk lamp close to your workspace. Use LED lights for clear visibility. Overhead lighting helps, but a focused lamp lets you see small parts better.
Where can I find parts for my electronics workbench?
You can buy parts from online stores like SparkFun, AdaFruit, and Digikey. Local hardware stores also carry basic supplies. Compare prices and shipping times before you order.