You should follow each step closely when you order custom mobile pcbs. Good design files help you stop mistakes and slowdowns. Picking the right manufacturer is important, so check their quality, technology, and help. The table below shows what you should check in a manufacturer:
Factor | Description |
|---|---|
Quality standards and certifications | Look for ISO 9001 and UL certifications for safe custom boards. |
Manufacturing capabilities and technology | Pick the best technology for your custom needs, like HDI. |
Experience and expertise | Choose manufacturers who know mobile custom PCB design. |
Customer service and support | Good help makes it easy to ask questions and make changes. |
Location and shipping options | Nearby places can send your custom boards faster. |
Pricing and lead times | Check prices and lead times for your custom project. |
A clear process, like using panelization and design for manufacturability, makes your custom order quicker and smoother. This way can make quality better and lower costs.
Key Takeaways
Get your design files ready with care. Use Gerber files and make sure they are clear. This helps you avoid errors.
Pick a manufacturer you can trust. Check if they have quality certificates. See if they have lots of experience. Make sure their customer support is good.
Tell the manufacturer all your PCB needs. Say how many layers you want. Say what material you need. This stops delays in making your boards.
Look at your quote very closely. Make sure all prices are right. Check if the timeline is correct before you say yes to your order.
Check your boards as soon as they arrive. Look for any problems. Compare them to your order to make sure they are good.
Start Your Order for Custom Mobile PCBs
Upload Gerber Files
First, get your design files ready to start your order. Most pcb manufacturer websites want you to upload Gerber files. These files show the layers, lines, and holes in your custom pcbs. You can use other file types too. The table below lists the most common file types you can use:
Accepted File Formats |
|---|
Gerber |
.pcb |
.pcbdoc |
.cam |
.brd |
ODB++ |
IPC-2581 |
Check your files before you upload them. Make sure every layer is easy to see and has a label. This helps the pcb manufacturer know your custom design and stops mistakes. If you use the wrong file type, your order might be late or have errors.
Tip: Always look at your file names and layers before you upload. This small step can help you save time and money.
Specify PCB Requirements
After you upload your files, you need to tell the pcb manufacturer about your custom pcbs. You must give details about the materials, how many layers, thickness, and finish. These choices change how your custom pcbs work and how much they cost. The table below shows the main things you should tell them:
Factor | Description |
|---|---|
Layer Count | The number of layers changes what materials are used and the steps, which changes the price. |
Material Type | The material you pick changes how strong your board is and the price. |
Flexibility Requirements | Rigid, flexible, or rigid-flex types change how you use your custom pcbs and the cost. |
Operating Environment | Where you use your custom pcbs decides what materials you need and how much you pay. |
If you do not give clear details, you can have problems. The table below explains what can happen if you forget to add details:
Consequence | Explanation |
|---|---|
Production delays | Missing details can confuse people and slow down making your boards. |
Incorrect material choices | The pcb manufacturer might use the wrong materials for your custom pcbs. |
Failed performance targets | Your custom pcbs might not work right if you do not give clear instructions. |
You should always check your custom pcbs requirements before you finish your order. This step helps you get the right boards for your project.
Design Verification and Quotation
Manufacturer Design Check
After you upload your files and tell the pcb manufacturer what you need, they will check your design. This step helps you find problems before making your custom mobile PCBs. The manufacturer looks for mistakes, missing layers, or things that could make your boards not work. They follow rules called industry standards to do this job. Some important standards are in the table below:
IPC Standard | Description |
|---|---|
IPC-6011 | General Performance Specification for Printed Boards |
IPC-6012D | Qualification and Performance Specification for Rigid Printed Boards |
IPC-6013D | Qualification and Performance Specification for Flexible/Rigid-Flexible Printed Boards |
IPC-A-600 | Acceptability of Printed Boards |
IPC-A-610 | Acceptability of Electronic Assemblies |
IPC-2221 | Generic Standard on Printed Board Design |
IPC-2222 | Sectional Standard on Rigid Organic Printed Boards |
IPC-1710 | Printed Board Manufacturer’s Qualification Profile |
IPC-9151 | Printed Board Process, Capability, Quality, and Relative Reliability Benchmark |
The pcb manufacturer might use tests like UL tests, electrical stress tests, and reliability tests for special boards. You may see AOI for fast checks, ICT for testing with electricity, and functional testing for final checks. Each test is good for different things and helps in different ways.
Note: A good design check can help you save time and money because it finds mistakes early.
Receive and Review Quote
When your design passes the check, you get a quote. This quote tells you how much each part of your order costs. Most quotes have these things:
Component | Description |
|---|---|
Bill of Materials (BOM) | A detailed list of all components needed for your PCB, including part numbers, quantities, and descriptions. |
Gerber Files | Design files that specify your PCB’s layout, including component placement, routing, and board dimensions. |
Manufacturing Specifications | Details about the assembly process, such as soldering type, board layers, and PCB dimensions. |
Cost Breakdown | A transparent summary of costs, including labor, components, setup fees, and additional services. |
Many manufacturers have online calculators. You can use them to guess the cost based on your design, size, layers, and how many boards you want. If you give more details, you get a better guess.
Here is a chart that shows the usual costs for each step when you order a custom mobile PCB:
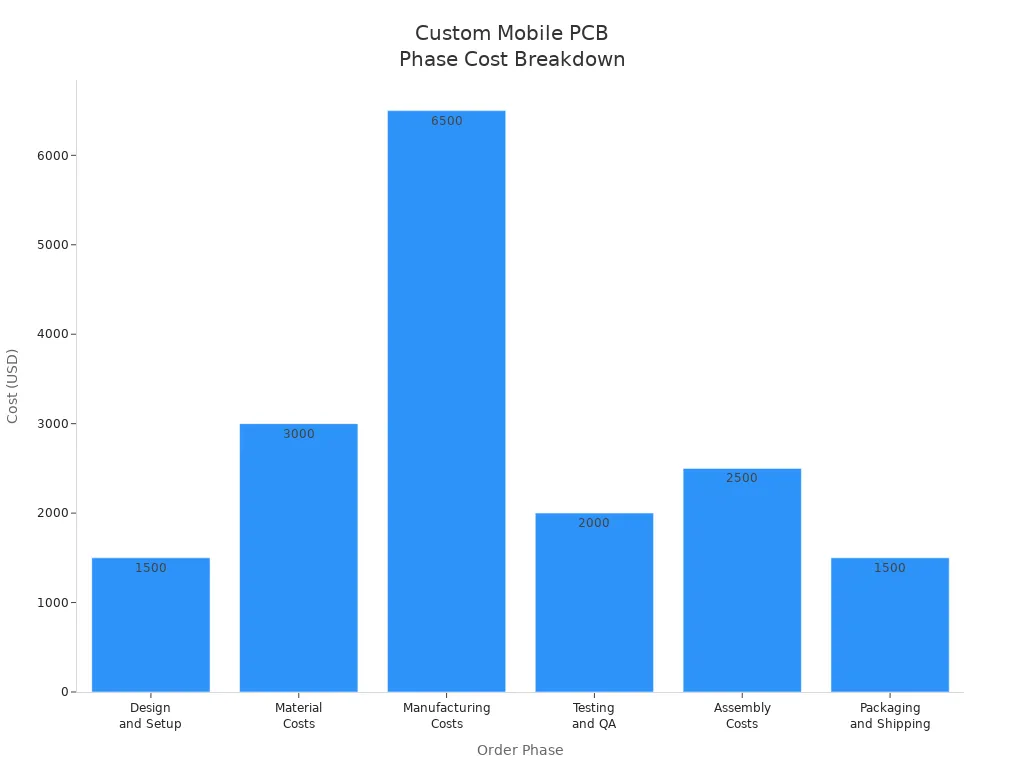
Tip: Always look at your quote closely. Watch out for extra fees and make sure everything you need is there.
Confirm Order Details
Approve Quote and Timeline
You should check every detail before you say yes to your order. This step helps you stop mistakes and delays. Look at the quote and timeline very carefully. Make sure the price, delivery date, and services are what you want. If you see a mistake, ask the manufacturer to fix it before you go on.
Here is a checklist to help you check your order:
Give the manufacturer all the information they need, like design files and a full Bill of Materials (BOM).
Check your design files again to find any mistakes.
Make sure your BOM has every part and the right details.
You should also look at the BOM for these common problems:
Wrong descriptions
Missing reference designators
Wrong or missing manufacturing part numbers
Missing details about special parts
Tip: Always add extra documents like the IPC netlist, schematic database, and a list of important parts with special needs. These help the manufacturer make your custom boards the right way.
Finalize Payment and Services
After you say yes to the quote and timeline, you need to pay. Most PCB manufacturers let you pay in different ways. Here is a table that shows the most common ways to pay:
Payment Method | Description |
|---|---|
Payment after order acceptance | You pay after the manufacturer says yes to your order. |
Payment upon dispatch | You pay when your custom boards are ready to ship. |
Lump-sum upfront payment | You pay the whole amount before they start making your boards. |
You can also use credit cards, PayPal, or wire transfer for your order. Pick the way that works best for you and your project.
After you pay, tell the manufacturer if you need extra services, like assembly or testing. Make sure they know about all your custom needs. Keep a copy of your payment and order details. This helps you track your order and fix problems if they happen.
Prototype and Sample Approval
Review Prototype Quality
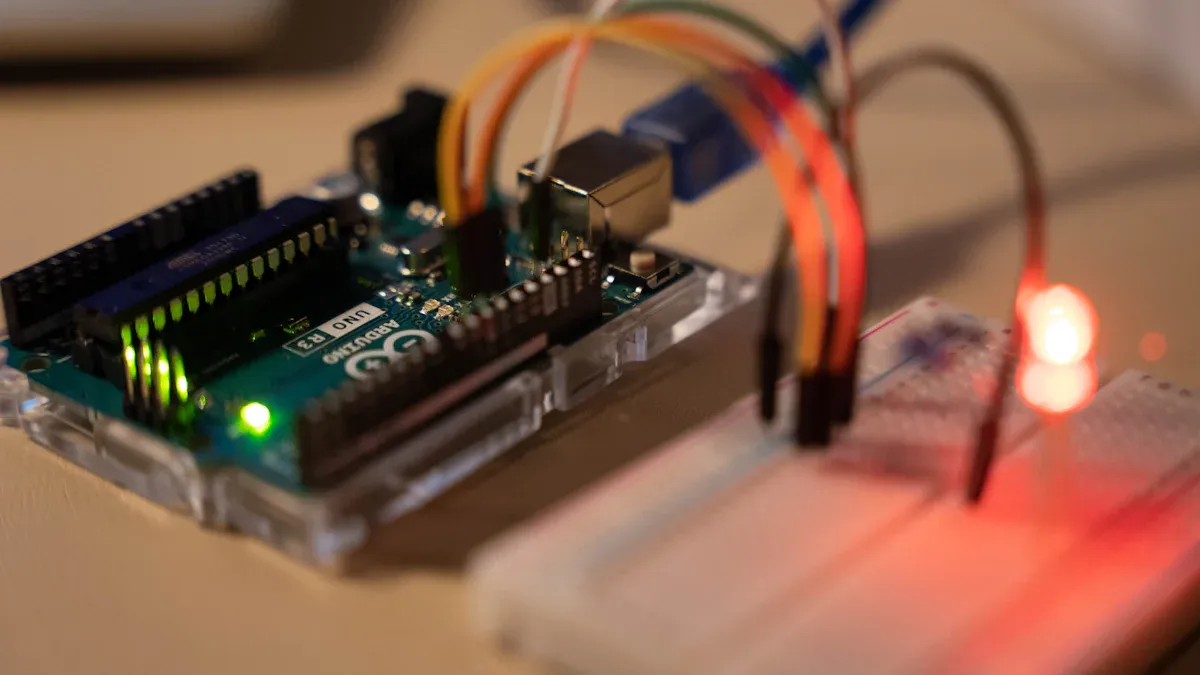
When you receive your prototype, you need to check its quality before moving forward with your custom project. Start by looking at the board for any visible defects, such as scratches or missing parts. You should also test the board to see if it works as planned. Many manufacturers use quick-turn services, so you might get your prototype in as little as 24 hours, but standard fabrication can take up to eight weeks. Fast delivery helps you spot problems early and keep your custom project on track.
To make sure your custom prototype meets industry standards, focus on these key quality indicators:
First Pass Yield (FPY): Check if your prototype passes all tests the first time.
Defect Rate: Count how many boards have problems.
Cycle Time: Measure how long it takes to assemble your custom board.
Throughput: Track how many boards you get in a set time.
Overall Equipment Efficiency (OEE): See how well the machines work during assembly.
Tip: Keep a checklist of these points when you review your custom prototype. This helps you find issues quickly and talk to your manufacturer with clear facts.
Request Adjustments if Needed
If you find any problems with your custom prototype, you should ask the manufacturer for changes. Make a list of the issues you see, such as wrong parts, missing features, or poor soldering. Use photos or notes to show what needs fixing. Good communication helps you get the right custom board for your needs.
You can follow these steps to request adjustments:
Write down each problem you find on your custom prototype.
Share your notes and photos with the manufacturer.
Ask for a new sample if the changes are big.
Approve small fixes by email or through the manufacturer’s website.
Note: Quick feedback helps the manufacturer fix your custom board faster and keeps your project moving forward.
By checking your prototype and asking for changes, you make sure your custom PCBs meet your needs before full production starts.
Production of Printed Circuit Boards

Pre-Production Engineering
The first step is pre-production engineering. This step helps stop problems later. Engineers check your design files for mistakes. They make sure your files work for making the boards. They look for things that could cause defects or slow work. Here are the main things done in pre-production engineering:
Engineers check if your design is easy to build. They look for things that make building hard.
They use CAM software to check the layers. The software makes sure all parts line up right.
The team makes output files. These files have drill files and images for each layer.
You also get a review of your PCB design. The team checks your bill of materials. They pick the best manufacturing technology. The team sets up machines and plans quality checks. Talking with your manufacturer helps fix problems fast.
Tip: Always ask your manufacturer about their checks before making your boards. This helps you get better custom printed circuit boards.
PCB Fabrication and Inspection
After pre-production, your boards go to fabrication and inspection. The manufacturer uses good materials and follows careful steps. They use machines to control the process and keep defects low. High defect rates can cost more money and cause delays. So, quality control is very important.
Here are some common quality control steps:
Reviews to make sure designs are easy to build
Picking the right materials
AOI to find surface problems
X-ray checks for hidden issues in many-layer boards
In-circuit tests to check how the board works
Functional tests to see if the board works in real life
Stress tests to check if the board is strong
Manufacturers follow rules like ISO 9001 and IPC-A-600. These rules help make sure your boards meet industry standards. If you see a defect rate of about 6.68%, there may be problems with cost and delivery. Always look at inspection reports before you accept your boards.
Note: Careful checks help you get reliable custom printed circuit boards for your project.
Assembly and Testing (Optional)
Component Soldering
You can let the manufacturer put together your custom boards. Workers or machines place and solder each part on the board. Good soldering keeps parts from moving and helps the board work. There are two main ways to do this. Surface-mount technology puts parts right on top of the board. Through-hole technology puts part leads through holes before soldering.
Here are some steps in the soldering process:
Machines put parts on the board.
Solder paste goes on the pads.
The board gets heated in a special oven to melt the solder.
The board is checked for missing or wrong parts.
Tip: Ask if your manufacturer uses machines to check for mistakes. These machines help find problems early and make the boards better.
Functional Testing
After soldering, you need to check if your board works. Functional testing makes sure every part does what it should. Special machines test the circuits, measure voltages, and check signals. This step helps you find problems before using the board.
Some problems found during testing are:
Type of Failure | Description |
|---|---|
Electrical Failures | Short circuits, open circuits, or voltage problems that stop the board from working. |
Mechanical Failures | Cracks, broken parts, or parts not lined up right that hurt connections. |
Thermal Failures | Too much heat or bad solder joints that make parts stop working. |
If you find these problems, tell your manufacturer fast. Fixing problems quickly helps your project stay on track.
Note: Always look at your test results and reports. Careful checks help you get good boards for your mobile devices.
Shipping and Delivery of Custom PCBs
Track Shipment
After you finish your order, you need to track your custom pcbs as they ship from the manufacturer. Most companies give you a tracking number. You can use this number on the shipping company’s website to see where your printed circuit boards are at any time. Fast shipping options like DHL, UPS, and FedEx help you get your custom pcbs quickly. Standard shipping takes longer but costs less. Here is a table that shows common shipping methods and how long they take:
Shipping Method | Lead Time (Business Days) |
|---|---|
DHL | 3-7 |
UPS | 3-7 |
FedEx | 4-7 |
Global Standard Shipping | 8-13 |
EMS | 15-30 |
You may need to handle customs when your custom pcbs arrive in your country. Some countries ask for an identification number or special documents. You might also need to pay import taxes or duties. Here is a quick look at what you may need:
Requirement Type | Description |
|---|---|
Identification Number | Some countries need a tax ID or unique number for customs. |
KYC Documents | In some places, you must show ID and address proof. |
Import Taxes and Duties | You pay any taxes or fees when your printed circuit boards arrive. |
Tip: Always keep your shipping documents ready. This helps you clear customs faster and avoid delays.
Inspect Delivered Boards
When your custom pcbs arrive, you should check them right away. Start by opening the package and looking at the printed circuit boards for damage. Use a sampling plan if you have many boards. Check each board against your order and the fabrication drawing. Here are steps you can follow:
Look at every printed circuit board for scratches, cracks, or missing parts.
Compare the boards to your drawings and requirements.
Use IPC-A-600 as your guide for quality.
Ask for a laboratory report if your project needs it.
If you find problems, contact the manufacturer with photos and notes.
You can also use these steps for a deeper check:
Use online AOI inspection to find defects.
Do a first article inspection to check part placement.
Use in-process quality control for random checks.
Try 3D X-ray inspection for hidden solder joints.
Finish with a final quality check using IPC-610 standards.
Note: Careful inspection helps you catch problems early. This protects your project and makes sure your custom pcbs work as planned.
By tracking your shipment and checking your printed circuit boards, you make sure your custom pcbs arrive safely and meet your needs.
When you order custom mobile pcbs, follow each step so you do not make mistakes or have delays. Talk with your manufacturer often and tell them about any updates or changes.
Work together to fix problems quickly
Give simple instructions and check your files
Test your boards and look at the results
Write down everything for every order custom mobile pcbs process. Use this table to keep track of important papers:
Record Type | Description |
|---|---|
Certificate of Conformity | Shows your order custom mobile pcbs follows rules. |
Quality Records | Keep these for at least ten years. |
First Article Inspection | Check the first group to make sure it is right. |
Taking action early helps you finish projects faster and get better results.
FAQ
What files do you need to order a custom mobile PCB?
You need to upload Gerber files. These files show the design of your board. Some manufacturers also accept .pcb, .brd, or ODB++ files. Always check the file type before you send your order.
How long does it take to get custom mobile PCBs?
Production time depends on your order. Quick-turn services can deliver in 1-3 days. Standard orders may take 1-3 weeks. Shipping time adds extra days. Ask your manufacturer for a clear timeline.
Can you order just one prototype PCB?
Yes, you can order a single prototype. Many manufacturers offer low minimum order quantities. This helps you test your design before you order more boards.
What should you do if your PCBs arrive with defects?
Check your boards right away. Take photos of any problems. Contact your manufacturer with details and pictures. Most companies will help you fix the issue or send replacements.